How To Setup Your Dell Inkjet Printer And Change Ink Cartridges?
Dell Inkjet printers are highly reliable and economical printers for your regular home and office needs. These high-quality printers provide high-resolution printers, sharp text, and impressive graphics. Dell Inkjet printers are well known for their user-friendly nature and compatibility with almost all operating systems. You can connect your Dell printers via wireless connectivity. Wireless connection is one of the convenient options for printing from your computers or mobile devices. Some Dell inkjet printers offer automatic duplex printing, while others do not. But, a complete setup is a primary step to access its feature. This guide will show you how to setup your Dell Inkjet printer and change ink cartridges. So stay tuned to this blog to learn more.
Dell Inkjet Printer Setup
The setup for the Dell inkjet printer involves downloading the latest printer drivers from Dell's official website. You will need a desktop to connect your Dell printer. So, get ready with your desktop and Dell printer and start setting up.
Step 1: Unbox the Dell Inkjet Printer
The first and foremost step is to unbox your Dell printer and remove all its protective coverings to unveil the printer. Your printer package has a set of necessary accessories. Ensure the package has all of them.
Step 2: Connect the Printer to Power Cord
Take the power cord from the printer's box and plug it into one end of the printer's power port and the other into the power source.
Step 3: Install Ink Cartridges
Start by opening the access door and letting the cartridge holder come into the centre. Then, take off all the protective coverings from the ink cartridges and place them into their respective slots. At last, close the access door of the cartridge.
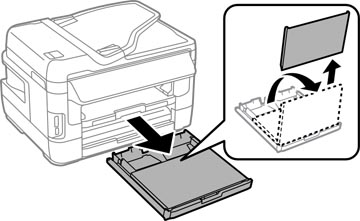
Step 4: Insert the Paper/Documents
Now, place the paper or documents in the paper tray by adjusting the paper guides. This is to ensure that the input tray fits your paper size. Plus, ensure that the paper is aligned correctly into your paper tray.
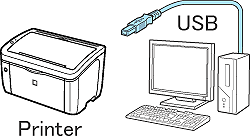
Step 5: Connect the Printer to Your Computer
In this step, you have to connect your Dell printer to the computer using a USB cable. Although, you can connect both devices using wireless connectivity. Refer to the printer's manual to connect it to a Wi-Fi network.
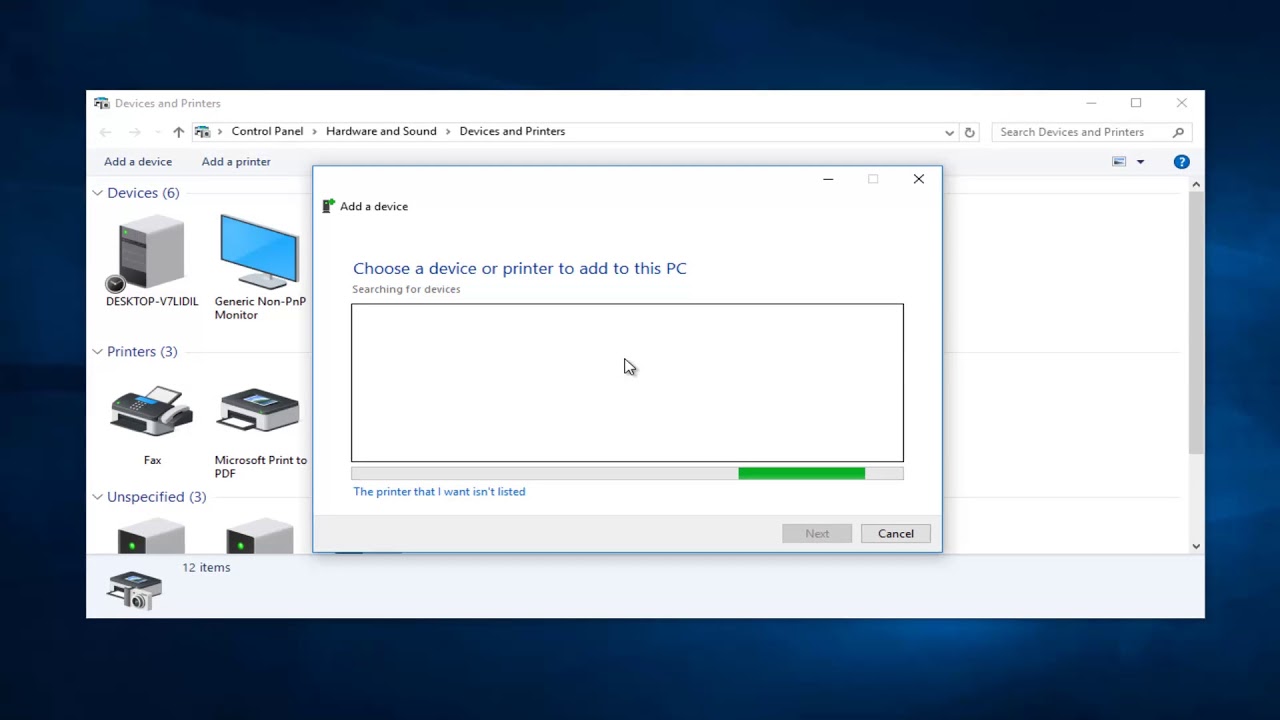
Step 6: Install Dell Printer Drivers
This step involves the download of necessary printer drivers to operate your Dell printer. There are two options to install them on your desktop. We will see both one by one. Follow the steps below.
Method 1: Install Drivers via CD
-
You may get a CD with your Dell inkjet printer.
-
Insert it into your computer's CD/DVD drive.
-
Then, follow all the on-screen directions to install printer drivers.
-
Make sure you select all the right options for your Dell printer model and desktop.
Method 2: Install Drivers From Dell Official Website
-
Go to the Dell Support website and locate the Drivers & Downloads option.
-
After that, supply your Dell printer model from the given list.
-
Then, select your Operating System through the drop-down menu.
-
Now, download the latest printer drivers compatible with your operating system.
-
After that, navigate to the Downloads folder to run the installation.
-
Lastly, follow all the on-screen steps to install the latest printer driver and software.
Step 7: Adjust the Printer Settings
When you install the printer drivers, you are required to adjust the printer settings, including paper size, print quality, language, etc. You can find these settings from the printer software or the printer's control panel.
Step 8: Take a Test Print
When you have completed all the above steps, it's time to print a test page. This step ensures that your printer is functioning properly. You can confirm that your printer has been set up correctly, and nothing is left to bother you.
Finally, you have set up your Dell inkjet printer on your desktop. So, you can use it to print any document for your office or home needs. However, if you find any additional information related to the troubleshooting or features, you should refer to the printer's manual.
How to Change Ink Cartridges in a Dell Inkjet Printer?
Ink cartridges have a limited capacity, and as you print your documents, the ink level will gradually fall. Hence, your ink cartridges will run out of ink. So, it needs ink replacement to continue printing. Also, ink cartridges ensure print quality; if they aren't maintained, the print quality will be affected. So, in order to sustain high-quality printing, you have to change them when needed.
The drying out of ink cartridges and clogging may also be a potential reason to replace them. Plus, to increase the printer's performance, you should have an eye on ink cartridges. If you don't know about inkjet printer refills, learn from the steps below.
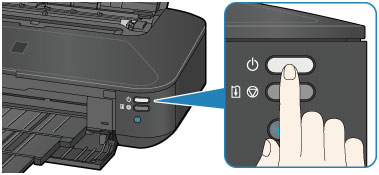
Step 1: Turn on Your Printer
When you are changing ink cartridges, ensure that the Dell printer is turned on and the print head is aligned properly.
Step 2: Open the Cartridge Slots
Next, find the access door on your Dell inkjet printer, which is located on the front or top of the Dell printer. Then, open the door gently to open the ink cartridge slots.
Step 3: Locate the Empty Cartridge
When you open the door, find the empty cartridge that needs to be replaced. Your printer may highlight it through a display or indicator light to reveal the empty cartridge.
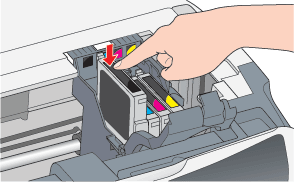
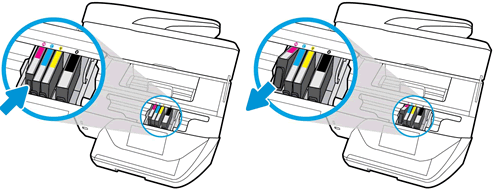
Step 4: Get the New Cartridge
Open the new cartridge by removing its packaging. Remove all protective covers from it. Do these steps carefully and avoid touching the printhead.
Step 5: Install the New Cartridge
Now, you can insert the new ink cartridges into their respective slot and align them with the right place. Then, press the cartridge so that it clicks into the place properly. You can repeat this process for another ink cartridge that needs to be replaced.
Step 6: Close the Cartridge Access Door
Confirm that all the cartridges are installed properly. Then, close the cartridge access door properly until it clicks in.
Step 7: Adjust the Ink Cartridges
Your Dell printer will ask you to adjust the ink cartridges after installation. Then, proceed with the on-screen instructions to perform the alignment of the cartridges.
Step 8: Take a Test Print
Once you have successfully installed your new cartridges, it's time to take a print test. It will ensure that your Dell printer works correctly and new cartridges are installed well.
Before taking action, please refer to your Dell inkjet printer's model, as different models may have different steps. Also, it is recommended to use genuine Dell ink cartridges, as third-party cartridges may not work well. In order to ensure print quality and performance, you must trust the genuine cartridges.
Conclusion
To sum up, setting up your Dell inkjet printer and changing ink cartridges is a quick and easy process that ensures optimal performance and print quality. By following the step-by-step directions provided, you can easily install the printer and efficiently manage ink, leading to a smooth and hassle-free printing experience. Maximize the potential of your Dell inkjet printer today!
Frequently Asked Questions
How Do I Setup My Dell Printer On My Device?
How Do I Change Ink Cartridges In My Dell Printer?
Do You Need A Computer To Setup A Dell Inkjet Printer?